Upgrading My Workspace
Increasing the enjoyability of my workspace to reduce friction towards action and encourage greater achievement.
Showcase
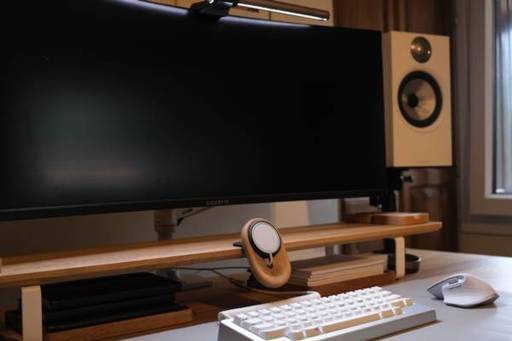
Desk Setup
The guiding principle throughout the aggregation of this revamped workspace was that of longevity and quality. I have opted to spend more in the pursuit of longevity, in mind that additions like a quality desk, chair, etc, will last a very long time.
As such, I see it less of an expense and more of an investment. In spending hours each day at this workspace, the cost per use steadily decreases and is projected to be very small, even if the upfront cost is large.
It was also kept in mind that by increasing the enjoyment of being at the workspace, I would be more inclined to spend time at it and so to produce more.
I started with the chair; the chair. A Herman Miller Aeron.
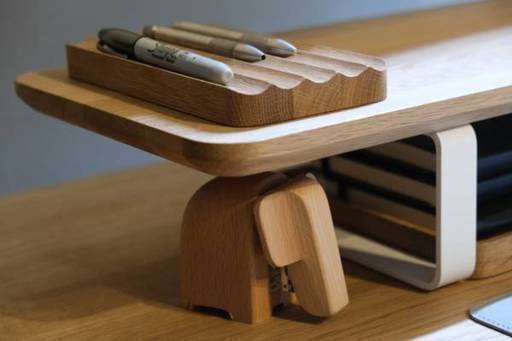
Like having an ergonomic chair promotes better health through the provision of back support, I wanted a standing desk to further promote better health. I landed on the Oakywood Standing Desk.
With the essentials taken care of, a wide-screen monitor with a large amount of screen real-estate was the next step. In this case a Gigabyte G34QWC. While a good desk and chair promotes good health, a large amount of screen real-estate promotes productivity by allowing all required references to be on-screen at the same time.
I then wanted a monitor arm for support so that I don’t need the monitor’s base and so can maximise the desk space. For this I went with the Ergotron LX. Another benefit is the increased range and ease of adjustment.
A grey leather desk mat would suit the desired look while providing a good surface for the mouse to glide on and having a long lifespan, so I got a ULX Minimalist Desk Mat.
On to the mouse, and it had to be the Logitech MX Master 3S. The go-to productivity mouse for all its innovating features, now with tactile clicking.
Coming from the 65% Aluminium-framed Drop Alt High Profile, I wanted a similar sized keyboard but with a more tactile feel. The HHKB was the obvious choice, but I didn’t want to lose the heavy, metal base. In comes the Norbauer’s Heavy Grail aftermarket casing.
For better lighting and reduced eye strain, I sought a light bar to place on top of the monitor. The BenQ ScreenBar Halo works well with the curved screen on the monitor.
I then got various accessories to organize cables, stationery, and other small, loose items like USB sticks. This comprised an under-desk organiser, a desk shelf and a bunch of trays, all of which are from Oakywood to match the desk itself.
The result is a comfortable station in which I want to spend time at. One that best promotes health and productivity, enabling greater progress.
PC Setup
I built my last PC in 2013 and, with little to no upgrades (besides disk space) over the past near-decade, it was time for an upgrade.
Since it had been a while, a single component upgrade to latest, or near-latest, generation hardware would require a full re-spec. So I thought it time for a completely new build. That, and I enjoyed building the last one from nothing but individual parts.
For the new build, I wanted something that:
- Is able to handle computationally intensive tasks relatively quickly
- Has enough memory to support the running of multiple applications and loading medium-to-large datasets
- Is able to store, read, and write large files like high-res photos and medium-large datasets
- Will continue to be effective with minimal upgrades
- Has a clean and minimal aesthetic
After loading up PC Part Picker I decided that the CPU is the natural place to start as it guides the addition of subsequent parts through compatibility requirements.
I looked to AMD as they had seemed to be providing better options than Intel in recent years. Then, reasoning that I didn’t need the AM5 chipset found in the 7000 Series, I explored the AM4 options in the 5000 series and settled upon the AMD Ryzen 7 5800X with a Base Clock Speed of 3.8GHz, 8 Cores, and 16 Threads.
Needing an AM4 compatible Motherboard with M.2 SSD slots, I found NZXT with options meeting this criteria while offering the desired aesthetic. By this time I’d opted for a white build. While white components often cost more (sometimes much, much more), I figured that this was a long-term purchase and that with careful consideration of options I could largely skirt around this issue. I got the NZXT N7 B550.
For memory I figured I would need 32GB. It had to be DDR4, and a decent speed would be 3600MHz. I opted for TEAMGROUP Xtreem ARGB White with 2x16GB sticks, so that I am only using 2/4 slots on the motherboard and can easily expand.
I got the fastest M.2 SSD I could find, with 2TB of storage and it’s own heat sink! The Crucial T500 2TB NVME M.2 SSD is plenty but if needed I have the options of another M.2 slot and two SATA slots.
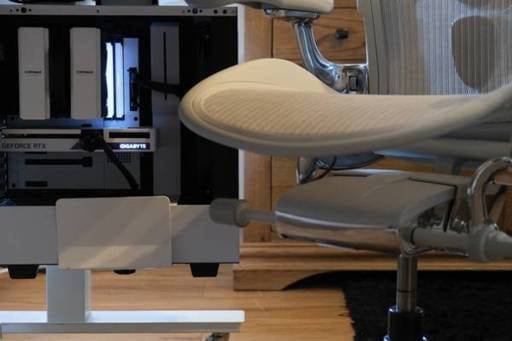
A mid-range GPU is fast enough for all of my current tasks, although an upgrade in the future is inevitable. However, advancement in hardware would mean that by the time it came to needing an upgrade I could get more performance for less if I were to wait. So for now I’m using a Gigabyte Vision OC GeForce RTX 3060Ti.
Already with an NZXT Motherboard, I saw it fitting to match it with an NZXT Power Supply, the NZXT C650 Gold. I later found it was ranked A Tier by the Cultists Network’s PSU Tier List1, marking it as a good choice. It does however only cover the power draw of my current components and would need to be upgraded should I move to a more power-hungry GPU like the latest of Nvidia’s RTX Series.
With the All-White aesthetic taking hold, the sleek design of the NZXT H510 was the obvious choice for a case to house my components. Complete with a glass panel.
I invested quite heavily into cooling as keeping temperatures low is important for performance while also improving the longevity of other parts by reducing potential wear through overheating. They’re also some of the longest lifespan parts, with them being easily transferred into subsequent builds.
I didn’t want to mess around with water cooling though, as it requires additional maintenance and is more issue prone. With air cooling you only need to clear dust every now and then.
I replaced the 2 stock fans that came with the case and filled the other 2 slots with 3x Noctua NF-A14 PWM chromax.black.swap and 1x Noctua NF-F12 PWM chromax.black.swap. I also swapped out the stock CPU cooler for the Noctua NH-D15S chromax.black, a single fan between 2 large radiators. Noctua was the obvious choice as they come so highly rated for cooling solutions.
Since building, this has been unfailing in demanding tasks, quickly fulfilling any need.
Audio Setup
I had wanted some Hi-Fi level audio after reading Julian Shapiro’s Hifi Audio2 guide.
After searching, those by Bowers & Wilkins were highly recommended. I then viewed their catalogue and chose their last-gen mid-sized loudspeakers, the Bowers and Wilkins 606 S2 Anniversary Edition.
I then needed to raise them up such that my ears were aligned in between the speaker’s cones and tweeters. I got the Gator Frameworks Clamp-On Speaker Stand. This would improve the listening experience while reducing their footprint on the desk.
The B&W 606 S2 are a passive speaker, meaning that an amplifier is required for playback. The speaker/amplifier combination can effect the listening experience, with different combinations giving different sound signatures which would be more or less preferable. I got the Marantz PM7000N as amplifiers by Marantz are highly recommended in combination with Bowers & Wilkins speakers.
The discussion around cables is very opaque, with many refuting or touting their effects. I saw it recommended to spend roughly 10% of the speaker & amp cost on cables and was offered a bundle for an AudioQuest NRG-Y3 power cable and QED XT25 speaker wires for around this so chose to opt for them. I then purchased a cheap optical cable to connect the amp to my PC.
This is more than enough for me and will undoubtedly provide for a long time. I’ve only turn the volume on the Amp to 100 once, for a fraction of a second before I hurried to turn it down so that my ears didn’t start bleeding—it gets loud.
My favourite track thus far has been Hans Zimmer’s Mountains, from the Interstellar soundtrack.
Cable Management
In order to keep everything nice and tidy, I opted to mount my PC to the underside of the desk, on the right. This would keep it out of the way and reduce dust build-up. The build as a whole is fairly heavy and the case is mid-sized so most mounts were either too small or too weak, but I found one from Friska that would work, the Friska Desk Marstrand.
By this point, most of the wires are out of the way and the plug socket is close-by, so there isn’t much left to tidy. But to collect and conceal the bulky ones to and from the amplifier, I used a cable snake, a Friska Desk Kiruna, mounted to the underside of the desk on the back right-hand side.
Cable ties were then needed to tie any loose cables down and restrict their length.
An extension lead was required to increase the number of power outlets. This also was mounted to the underside of the desk, this time at the center-back. This would allow for most of the cabling to be secured to the underside of the desk with as little as possible going away from it; i.e. to a plug socket.